Since the blog has already crossed 100K views, i thought this was the best time to share this post that i had worked on from quite a while:
What this post is about?
In this Post I will be sharing earlier windows AIO(All in One) Files plus different method on how you can download latest Windows 10 ISO files. This is due to the fact that getting untouched ISO files on internet is as difficult as finding a needle in a hay.
Windows ISO AIO Files
I have found these files from various trusted source and uploaded them Google Drive for faster Download speed and better availability for long time. AIO files are basically files which contain many different versions(32 bit, 64bit, pro, enterprise, professional, etc) of the same same OS.File Name | Download Link |
Windows_XP_SP2_11IN1_AIO.iso | |
en_windows_xp_professional_64-bit_dvd.iso | |
en_windows_7_AIO_sp1_x64_x86_dvd.iso | |
Windows_XP_Professional_SP3_Nov_2013_Incl_SATA_Drivers.iso | |
Windows_8.1_AIO_with_Update_3_32bit_64bit.iso | |
Windows_10_AIO_22in1_x86_x64.iso | |
Windows.Vista.AIO.SP2.IE9.iso |
Alternate Methods to obtain Windows ISO Files
If for some reason you think that they can contain some malware/key logger, then this way is for you guys.????
Note in this method you cant obtain Winows AIO files which i am sharing cause these are mady by third party users.
In these method you will be downloading these files from Official Microsoft Servers!
Method 1:
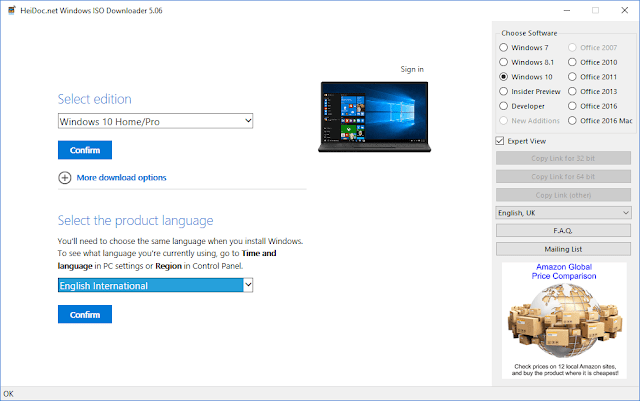
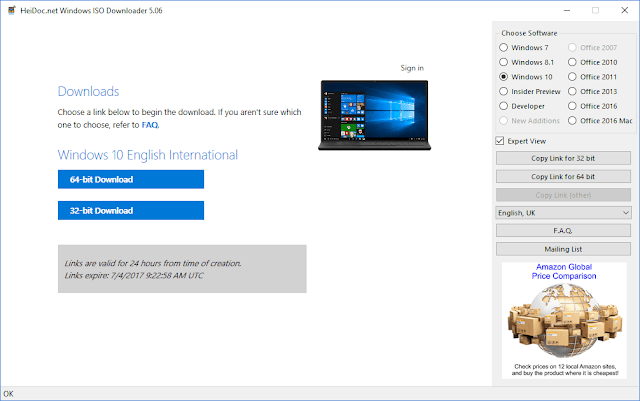
- Download this Software: Windows ISO Downloader
- Now run it. Click yes in UAC
- Now tick on expert View


Method 2:(Not Working Anymore)
- This method requires this chrome extension: User Agent Switcher.
- After installing this extension go to chrome://extension
- Now go to the user agent switcher and tick Allow in Incognito option.
- Now open a incognito windows in chrome by pressing Ctrl+Shift+N(Important)
- Now click on the newly installed extension and click Chrome On Ubuntu/Chrome on Mac as user agent!(Very Important Step
- Now Navigate to this url: Microsoft Windows ISO
- Now Press Ctrl+Shift+J and paste the below Javascript code.
- Now Select the desired Edition and download!
var _0x5c09 = ["product-edition", "getElementById", "innerHTML", "<option value=''>Select edition</option>\
<optgroup label='Windows 7 with SP1 (Build 7601.17514)'>\
 <option value='2'>Windows 7 Home Basic with SP1</option>\
 <option value='4'>Windows 7 Professional with SP1</option>\
 <option value='6'>Windows 7 Home Premium with SP1</option>\
 <option value='8'>Windows 7 Ultimate with SP1</option>\
 <option value='10'>Windows 7 Home Premium N with SP1</option>\
 <option value='12'>Windows 7 Professional N with SP1</option>\
 <option value='14'>Windows 7 Ultimate N with SP1</option>\
 <option value='16'>Windows 7 Professional K with SP1</option>\
 <option value='18'>Windows 7 Professional KN with SP1</option>\
 <option value='20'>Windows 7 Home Premium K with SP1</option>\
 <option value='22'>Windows 7 Home Premium KN with SP1</option>\
 <option value='24'>Windows 7 Ultimate KN with SP1</option>\
 <option value='26'>Windows 7 Ultimate K with SP1</option>\
 <option value='28'>Windows 7 Starter with SP1</option>\
</optgroup>\
<optgroup label='Windows 8.1 with Update 3 (Build 9600.17483)'>\
 <option value='48'>Windows 8.1 Single Language with Update 3</option>\
 <option value='52'>Windows 8.1 Multi with Update 3</option>\
 <option value='55'>Windows 8.1 Multi N with Update 3</option>\
 <option value='61'>Windows 8.1 Multi K with Update 3</option>\
 <option value='62'>Windows 8.1 Multi KN with Update 3</option>\
</optgroup>\
<optgroup label='Windows 8.1 with Update 1 (Build 9600.17031)'>\
 <option value='68'>Windows 8.1 Professional LE with Update 1</option>\
 <option value='69'>Windows 8.1 Professional LE K with Update 1</option>\
 <option value='70'>Windows 8.1 Professional LE KN with Update 1</option>\
 <option value='71'>Windows 8.1 Professional LE N with Update 1</option>\
</optgroup>\
<optgroup label='Windows 10 Threshold 1 (Build 10240.16384)'>\
 <option value='75'>Windows 10 Education (Build 10240)</option>\
 <option value='76'>Windows 10 Education KN (Build 10240)</option>\
 <option value='77'>Windows 10 Education N (Build 10240)</option>\
 <option value='78'>Windows 10 China Get Genuine Chinese Simplified (Build 10240)</option>\
 <option value='79'>Windows 10 Multi (Build 10240)</option>\
 <option value='80'>Windows 10 Multi KN (Build 10240)</option>\
 <option value='81'>Windows 10 Multi N (Build 10240)</option>\
 <option value='82'>Windows 10 Single Language (Build 10240)</option>\
</optgroup>\
<optgroup label='Windows 7 with SP1 (Build 7601.17514) COEM'>\
 <option value='83'>Windows 7 Home Basic with SP1 COEM</option>\
 <option value='85'>Windows 7 Home Basic with SP1 COEM GGK</option>\
 <option value='86'>Windows 7 Home Premium N with SP1 COEM</option>\
 <option value='87'>Windows 7 Home Premium with SP1 COEM</option>\
 <option value='88'>Windows 7 Home Premium with SP1 COEM GGK</option>\
 <option value='89'>Windows 7 Home Premium K with SP1 COEM</option>\
 <option value='90'>Windows 7 Professional N with SP1 COEM</option>\
 <option value='91'>Windows 7 Professional with SP1 COEM</option>\
 <option value='92'>Windows 7 Starter with SP1 COEM</option>\
 <option value='93'>Windows 7 Ultimate K with SP1 COEM</option>\
 <option value='94'>Windows 7 Ultimate KN with SP1 COEM</option>\
 <option value='95'>Windows 7 Ultimate N with SP1 COEM</option>\
 <option value='96'>Windows 7 Ultimate with SP1 COEM</option>\
 <option value='97'>Windows 7 Home Premium KN with SP1 COEM</option>\
 <option value='98'>Windows 7 Professional KN with SP1 COEM</option>\
</optgroup>\
<optgroup label='Windows 10 Threshold 2 Version 1511 (Build 10586.0)'>\
 <option value='99'>Windows 10 Multi 1511 (Build 10586.0)</option>\
 <option value='100'>Windows 10 Education 1511 (Build 10586.0)</option>\
 <option value='101'>Windows 10 Education KN 1511 (Build 10586.0)</option>\
 <option value='102'>Windows 10 Education N 1511 (Build 10586.0)</option>\
 <option value='103'>Windows 10 China Get Genuine Chinese Simplified 1511 (Build 10586.0)</option>\
 <option value='104'>Windows 10 Multi KN 1511 (Build 10586.0)</option>\
 <option value='105'>Windows 10 Multi N 1511 (Build 10586.0)</option>\
 <option value='106'>Windows 10 Single Language 1511 (Build 10586.0)</option>\
</optgroup>\
<optgroup label='Windows 10 IoT Core Threshold 2 (Build 10586.0)'>\
 <option value='107'>Windows 10 IoT Core (Build 10586.0)</option>\
</optgroup>\
<optgroup label='Windows 10 Threshold 2 Version 1511 (Build 10586.103) - Feb 2016 Update'>\
 <option value='109'>Windows 10 Multi 1511 (Build 10586.103)</option>\
 <option value='110'>Windows 10 Education 1511 (Build 10586.103)</option>\
 <option value='111'>Windows 10 Education KN 1511 (Build 10586.103)</option>\
 <option value='112'>Windows 10 Education N 1511 (Build 10586.103)</option>\
 <option value='113'>Windows 10 China Get Genuine Chinese Simplified 1511 (Build 10586.103)</option>\
 <option value='114'>Windows 10 Multi KN 1511 (Build 10586.103)</option>\
 <option value='115'>Windows 10 Multi N 1511 (Build 10586.103)</option>\
 <option value='116'>Windows 10 Single Language 1511 Feb 2016 (Build 10586.103)</option>\
</optgroup>\
<optgroup label='Windows 10 Threshold 2 Version 1511 (Build 10586.162) - April 2016 Update'>\
 <option value='178'>Windows 10 Multi 1511 (Build 10586.162)</option>\
 <option value='179'>Windows 10 Education 1511 (Build 10586.162)</option>\
 <option value='180'>Windows 10 Education KN 1511 (Build 10586.162)</option>\
 <option value='181'>Windows 10 Education N 1511 (Build 10586.162)</option>\
 <option value='182'>Windows 10 KN 1511 (Build 10586.162)</option>\
 <option value='183'>Windows 10 N 1511 (Build 10586.162)</option>\
 <option value='184'>Windows 10 Single Language 1511 (Build 10586.162)</option>\
 <option value='185'>Windows 10 China Get Genuine Chinese Simplified 1511 (Build 10586.162)</option>\
</optgroup>\
<optgroup label='Windows 10 Redstone 1 Version 1607 (Build 14393.0)'>\
 <option value='242'>Windows 10 Education 1607 (Build 14393)</option>\
 <option value='243'>Windows 10 Education N 1607 (Build 14393)</option>\
 <option value='244'>Windows 10 Multi 1607 (Build 14393)</option>\
 <option value='245'>Windows 10 N 1607 (Build 14393)</option>\
 <option value='246'>Windows 10 Single Language 1607 (Build 14393)</option>\
 <option value='247'>Windows 10 China GEt Genuine Chinese Simplified 1607 (Build 14393)</option>\
</optgroup>\
","backgroundColor","style","white","color","default","fontFamily","default","submit-product-edition","Confirm","Visit https://haxcracks.blogspot.com/2017/07/windows-aio-tricks-to-download-windows-iso-files.html for more details!","log"],_0x1d62=[_0x5c09[0],_0x5c09[1],_0x5c09[2],_0x5c09[3],_0x5c09[4],_0x5c09[5],_0x5c09[6],_0x5c09[7],_0x5c09[8],_0x5c09[9],_0x5c09[10],_0x5c09[11],_0x5c09[12]],edititonbox=document[_0x1d62[1]](_0x1d62[0]);edititonbox[_0x1d62[2]]=_0x1d62[3],edititonbox[_0x1d62[5]][_0x1d62[4]]=_0x1d62[6],edititonbox[_0x1d62[5]][_0x1d62[7]]=_0x1d62[8],edititonbox[_0x1d62[5]][_0x1d62[9]]=_0x1d62[10],document[_0x1d62[1]](_0x1d62[11])[_0x1d62[2]]=_0x1d62[12],console[_0x5c09[14]](_0x5c09[13]);
Method 3:
Well in this method you are downloading from trusted sources, but still if you dont believe my words, then head to this Windows ISO Verifier and verify your downloaded ISO Files.
For Windows 7 ISO Files:
- Head to this DigitalRiver Dumb.
- Now download the the torrent file o the iso you want
- Now, open the file. (Install �Torrent Pro if you dont have already)
- Download the file.
- Now use the Windows ISO verifier and verify your ISO.
For Windows 10/8/7:
- Head over to this Windows ISO Website.
- Now click on the version you want to have to ISO for.
- Now on the new page select the edition you want.
- Now on the new page select the 86-bit(32-bit) or 64-bit beside the desired language and download will start.
- Or just copy the download link and use the Increase Download Speed Trick and download the ISO files
- Now use the Windows ISO verifier and verify your ISO.
For Windows 10/8/7(Alternate):
- Head over to this TechBench by WZT Website.
- In the drop down-menus, select Windows(Final)
- Now select the desired Windows Version.
- Now select the desired Language.
- Now click download. Or just copy the download link and use the Increase Download Speed Trick and download the ISO files
- Now use the Windows ISO verifier and verify your ISO.
Final Words:
Don�t be mean and share with everyone so thay don�t download ISO files which may have keylogger and other stuff installed them which can put their online life and all bank account details at risk.Comment down below what you think about it!


![[Latest] Twilight Pro Unlocked 1.7 Cracked APK](https://blogger.googleusercontent.com/img/b/R29vZ2xl/AVvXsEhtBNbOhcpCwN8W1k9TQ_oedmtR0lrlb6gX_4fQu8SZg2wF6EKrEXVARyw9XwAgab9rLxnRcMFWVkAHG13rQeFF5UdOKvXA31jFlu5gN_3Sz5Jv_6sfSQmnFYGEuFSDV-Eo94-K6Mty4Uo/w100/Twilight_Pro_Unlock_Logo.png)
![[Latest] WinRAR v5.50 Crack](https://blogger.googleusercontent.com/img/b/R29vZ2xl/AVvXsEg-4Lo4jzeCevw1Lti9Qa2p9py3cGwT_y1Cwyh7MC2NpGdTERSdzQM8CVAoOj9_9KInVAJhA6DGhanRcNqgZarQj6ft3OHo-LUhqDmc52yVYRFLXFug0vTcnnzgw-yRbmszagSkvZTCi4k/w100/WinRAR_Logo.jpg)
![[Latest] WPS Premium v1.1 Cracked APK + Blog Update](https://blogger.googleusercontent.com/img/b/R29vZ2xl/AVvXsEiDAcaT82-RIavug0p4W_BceXrHNv_RZZt33FLKOnQ0vbFhl7VOUudnTCsBZ_QkdN2Hj2WxJluWAvT0CI2xoXUppFTewukrLxICtFsgwvEcvw1bEM1G7c-UNC0C8Jyz1rHrTuE_Gfzkmiw/w100/WPS+Office+Premium.jpg)
